
Initially, when building C# projects, I would have multiple solutions directly referencing the projects to be built. Sometimes, the solutions would have an extraordinary number of projects in them, so I could update them all in parallel.
However, this isn’t an ideal scenario as it makes it easy to blend code and develop tighter dependencies between modules that make future software development harder. By decomposing projects into smaller, more discrete and manageable components, we can increase the rigour around changes we make and have greater confidence in the code quality.
The use of NuGet to store versions of my packages means the applications I build can be small and lean and can work with already-defined mechanisms for publishing and retrieving packages.
I don’t want to publish my personal NuGet packages to a public repository (at least not without developing some confidence in the process first). So I have set up a Sonatype Nexus Repository to host NuGet packages.
I’ll go through the steps for configuring the Nexus Repository, Jenkins, and Visual Studio projects.
SonaType Nexus Configuration
We’ll need to configure an account for Jenkins to use within Sonatype Nexus with the necessary permissions, generate an API key for the NuGet command-line tool, and ensure our repository is set up for use.
First, go to the Nexus Repository Manager settings (the gear):

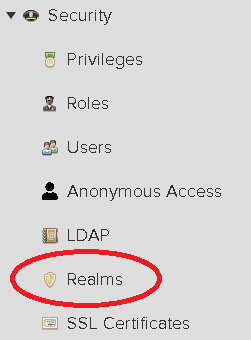
Then go to Realms along the left nav:
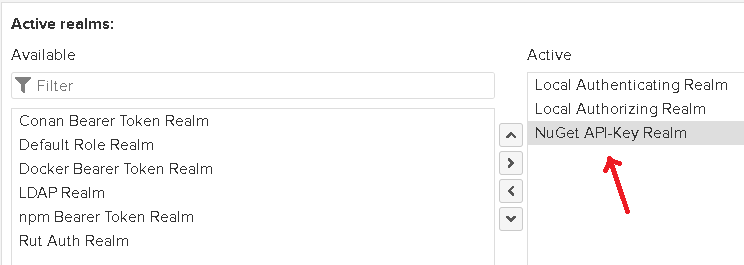
Ensure the NuGet API-Key Realm is active:
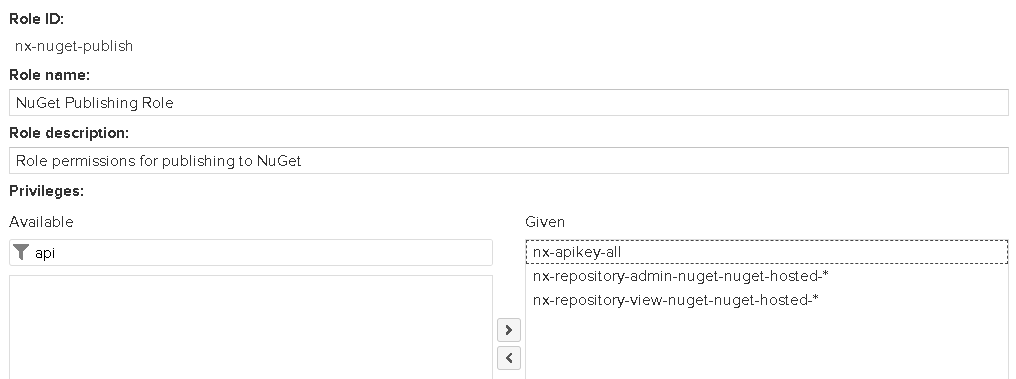
Then we will create a role in Nexus for NuGet in the hosted repositories:
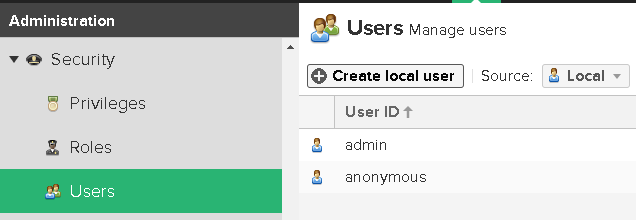
Next, we’ll create a Jenkins user:
And give it that role:

Next, we need to get the NuGet API key for our Jenkins user to use in our build scripts. To avoid having to log out of our admin account, we can use an incognito window to log in as our Jenkins user:
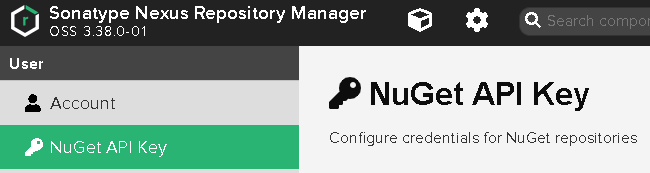
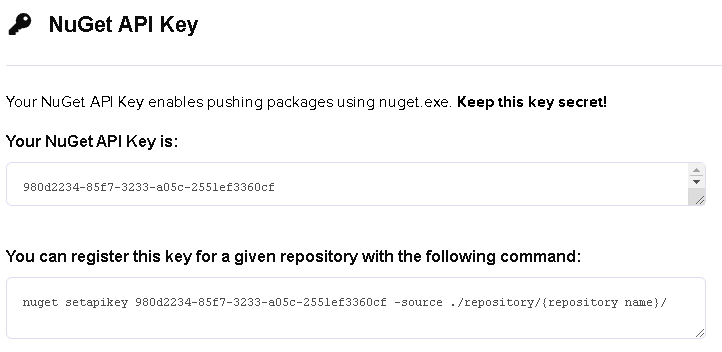
Then get the NuGet API Key (I’ve reset mine since this generation):
Jenkins Configuration – Credentials
Now that we have the NuGet API key for publishing to Nexus, we need to add it to Jenkins.
Log in to Jenkins and go to ‘Manage Jenkins’.
Go to the Security section and select Manage Credentials:
Select Global Credentials (typically at the bottom), and we’ll add a new credential:

You can also add credentials to build nodes within Jenkins instead of making them global. This is particularly useful for scoping credentials of the same name but different values for different builds.
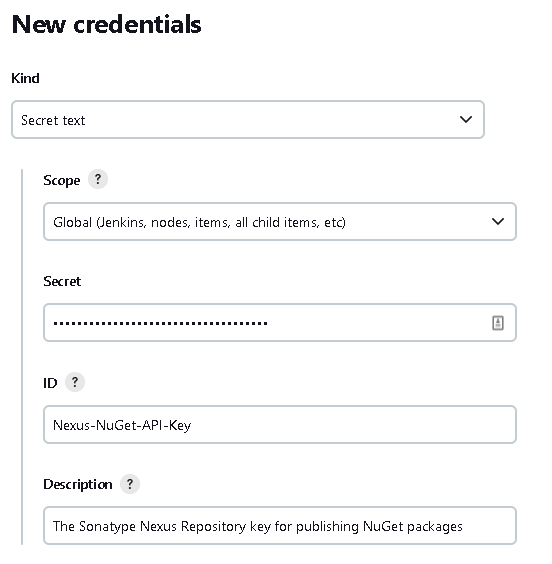
We’ll create a secret text credential to use with our API key:
Jenkins Configuration – NuGet Tool
Unfortunately, there isn’t a corresponding dotnet tool command for listing NuGet packages in a repository, so we’ll need to use the NuGet tool directly.
Install NuGet: You will need to download NuGet, a tool for gathering solution and project dependencies from NuGet libraries. It can be downloaded from the NuGet Client Tools page. Choose an installation location that Jenkins will have access to.
Install Jenkins Custom Tool Plugin:
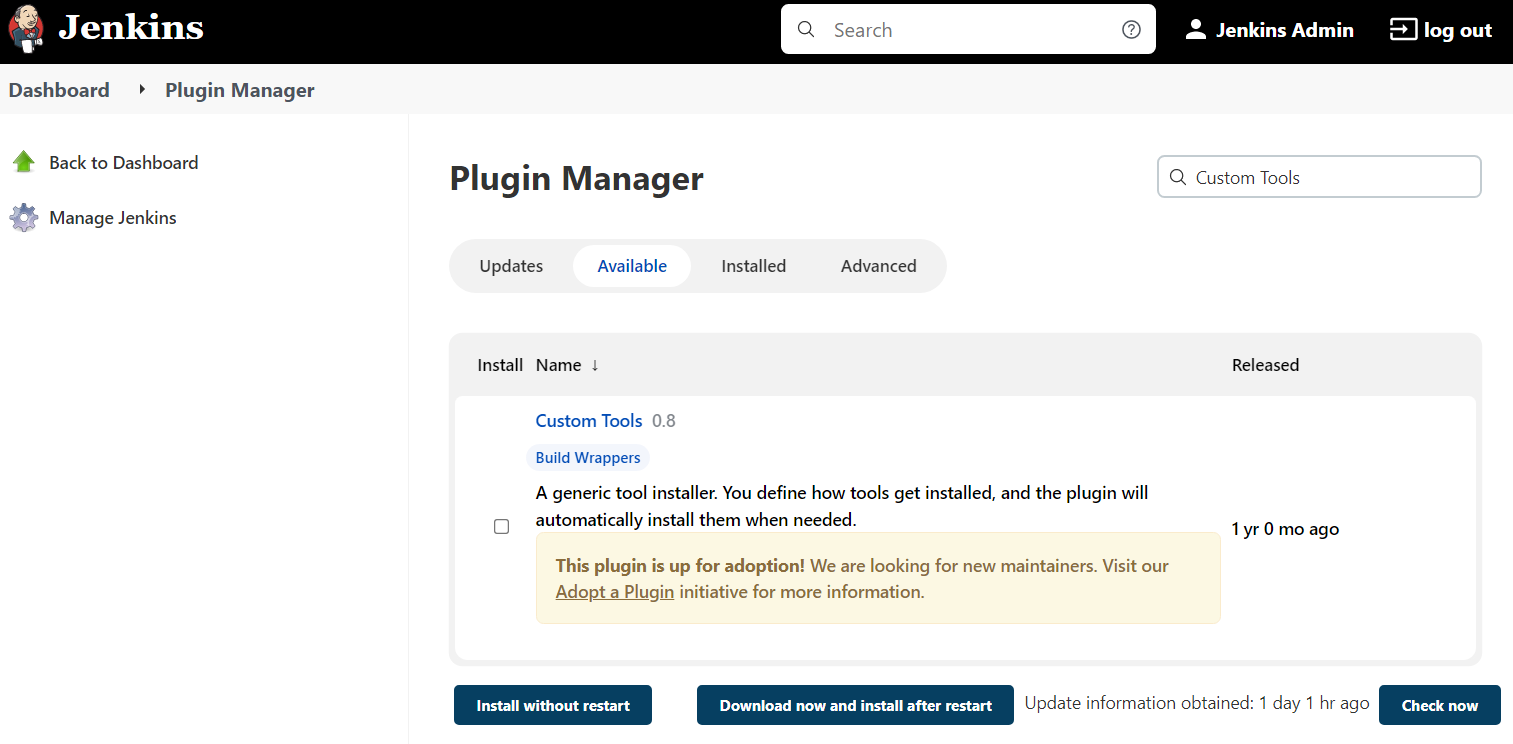
- In Jenkins, go to Manage Jenkins ⇾ Manage Plugins ⇾ ‘Available’ tab.
- Add: Custom Tools Plugin
- Add: Pipeline Utility Steps
Next, we need to configure the tools:
- In Jenkins, go to Manage Jenkins ⇾ Global Tool Configuration.
- Under Custom Tools, add a Custom Tool. This will be for NuGet. Call it ‘NuGet-2022’, disable automatic installation, and set the path to where nuget.exe was installed (d:\NuGet\nuget.exe in my case).
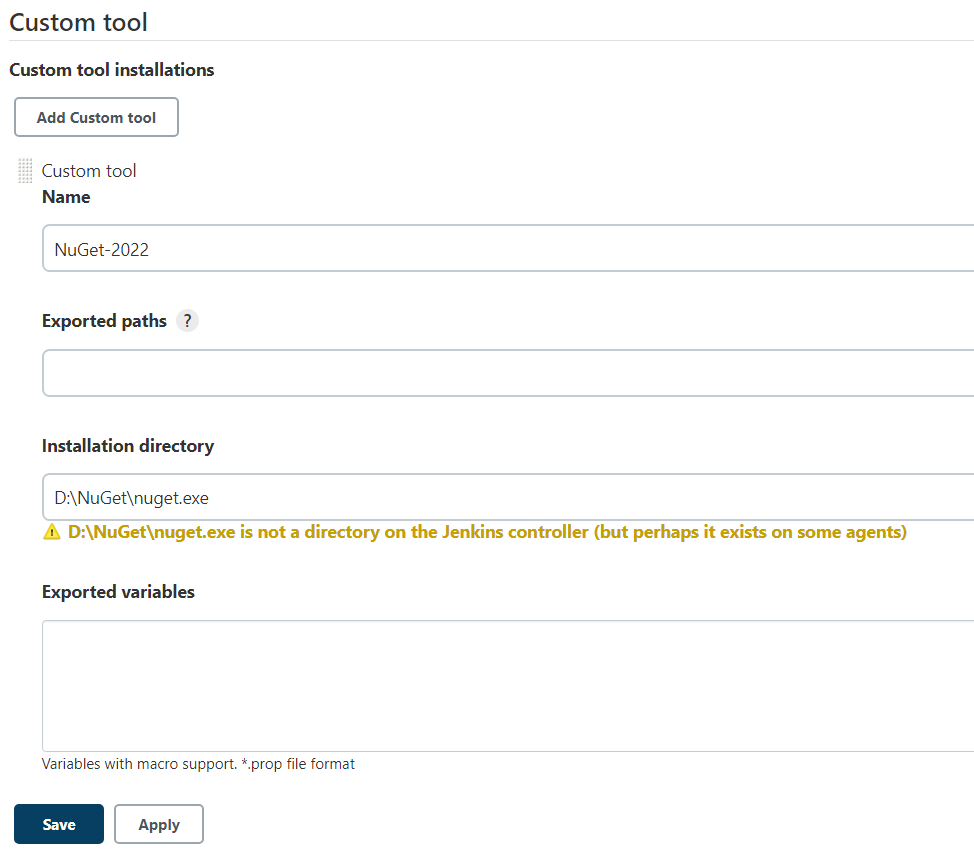
Save!
Build Script Changes
We need to add the steps to our Jenkinsfile.groovy to publish.
We have already configured NuGet as a tool. We can continue to do so.
The following block will publish to NuGet as part of the script:
        stage("NuGet Publish") {
            // We are only going to publish to NuGet when the branch is main or master.
            // This way other branches will test without interfering with releases.
            when {
                anyOf {
                    branch 'master';
                    branch 'main';
                }
            }
            steps {
                withCredentials([string(credentialsId: 'Nexus-NuGet-API-Key', variable: 'APIKey')]) {
                    // Find all the nuget packages to publish.
                    script {
                        def nupkgFiles = "**/*.nupkg"
                        findFiles(glob: nupkgFiles).each { nugetPkg ->
                            bat """
                                \"${tool 'NuGet-2022'}\" push \"${nugetPkg}\" -NonInteractive -APIKey ${APIKey} -Src http://${your-host}/repository/nuget-hosted
                                """
                        }
                    }
                }
            }
        }
This will publish if the branch is master or main (you may want to change this if necessary). All the NuGet packages it can find will be published. If you have many, this will do that for you. We don’t want to publish from branches that aren’t ‘master’ or ‘main’ as they aren’t official.
There are still a couple of details we want to tweak about how our scripts work.
We’ll want to start managing our versions more rigorously now. There is a standard for versioning called semver that we will use. Since we want to ensure we can publish from main/master, we’ll add a check whether a NuGet package exists of the same version. If there is, that is an error. So we don’t want to include the build number in our NuGet package version (otherwise, it will always be different), but we can include it in the file and assembly versions.
There is a useful description at Andrew Lock’s page: Version vs VersionSuffix vs PackageVersion: What do they all mean? that describes the various version values you can modify as part of C# builds and how they fit together.
I’ll use a separate file that I will call Configuration.json for the Jenkinsfile.groovy to set a base version and then have Jenkinsfile.groovy add the build number, but only for the file and assembly versions, not for the NuGet package version.
I’ll start with the contents:
{
    "Version": "1.0.0"
}
We then need to make some modifications to Jenkinsfile.groovy.
First, we’ll add some default definitions to the top of the file:
def version = "1.0.0.${env.BUILD_NUMBER}"
def nugetVersion = version
Unfortunately, using the clean option in MSBuild does not remove previously generated NuGet packages, so we’ll add a stage at the beginning of the stages to do just that:
        stage('Clean Old NuGet Packages') {
            steps {
                bat """
                    del /s /q *.nupkg *.snupkg
                    exit /b 0
                """
            }
        }
Then, before building, we’ll need to get the actual version number we want to use:
        stage('Configure Build Settings') {
            when { expression { return fileExists ('Configuration.json') } }
            steps {
                script {
                    def buildConfig = readJSON file: 'Configuration.json'
                    if(buildConfig.containsKey('Version')) {
                        def buildVersion = buildConfig['Version']
                        // Count the parts, and add any missing zeroes to get up to 3, then add the build version.
                        def parts = new ArrayList(buildVersion.split('\\.').toList())
                        while(parts.size() < 3) {
                            parts << "0"
                        }
                        // The nuget version does not include the build number.
                        nugetVersion = parts.join('.')
                        if(parts.size() < 4) {
                            parts << env.BUILD_NUMBER
                        }
                        // This version is for the file and assembly versions.
                        version = parts.join('.')
                    }
                }
            }
        }
Then we can update the command we use for building the solution to:
bat "\"${tool 'MSBuild-2022'}\" ${slnFile} /p:Configuration=Release /p:Platform=\"Any CPU\" /p:PackageVersion=${nugetVersion} /p:Version=${version}"
To avoid clobbering existing NuGet packages, we’ll check to see if our version has already been published and generate errors if so:
        stage('Preexisting NuGet Package Check') {
            steps {
                // Find all the nuget packages to publish.
                script {
                    def packageText = bat(returnStdout: true, script: "\"${tool 'NuGet-2022'}\" list -NonInteractive -Source http://localhost:8081/repository/nuget-hosted")
                    packageText = packageText.replaceAll("\r", "")
                    def packages = new ArrayList(packageText.split("\n").toList())
                    packages.removeAll { line -> line.toLowerCase().startsWith("warning: ") }
                    packages = packages.collect { pkg -> pkg.replaceAll(' ', '.') }

                    def nupkgFiles = "**/*.nupkg"
                    findFiles(glob: nupkgFiles).each { nugetPkg ->
                        def pkgName = nugetPkg.getName()
                        pkgName = pkgName.substring(0, pkgName.length() - 6) // Remove extension
                        if(packages.contains(pkgName)) {
                            error "The package ${pkgName} is already in the NuGet repository."
                        }
                    }
                }
            }
        }
Finally, we’ll publish the package if the branch is main or master:
        stage("NuGet Publish") {
            // We are only going to publish to NuGet when the branch is main or master.
            // This way other branches will test without interfering with releases.
            when {
                anyOf {
                    branch 'master';
                    branch 'main';
                }
            }
            steps {
                withCredentials([string(credentialsId: 'Nexus-NuGet-API-Key', variable: 'APIKey')]) {
                    // Find all the nuget packages to publish.
                    script {
                        def nupkgFiles = "**/*.nupkg"
                        findFiles(glob: nupkgFiles).each { nugetPkg ->
                            bat """
                                \"${tool 'NuGet-2022'}\" push \"${nugetPkg}\" -NonInteractive -APIKey ${APIKey} -Src http://localhost:8081/repository/nuget-hosted
                                """
                        }
                    }
                }
            }
        }
The entire Jenkinsfile.groovy is available online along with all the other sources used to make this sample at:Jenkinsfile.groovy
Visual Studio Project Configuration
To use packages pushed to the Nexus repository, you’ll need to configure your Visual Studio solution to look there.
To set up your Nexus repository, you can add a nuget.config file to the top-level folder of your solution with the contents:
<configuration>
  <packageSources>
    <add key="Nexus" value="http://coriander:8081/repository/nuget-group/index.json"/>
  </packageSources>
</configuration>
Notice that the repository in Nexus selected in the nuget.config is ‘nuget-group’ instead of ‘nuget-hosted’, where we push NuGet packages in the Jenkinsfile.groovy script. The ‘nuget-group’ automatically goes to nuget.org and caches results along with any packages in ‘nuget-hosted’.
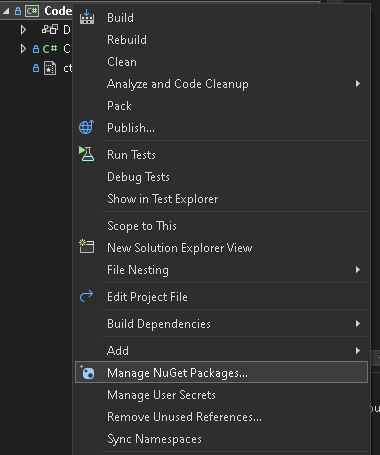
Then you can right-click on a project and select “Manage NuGet Packages…”
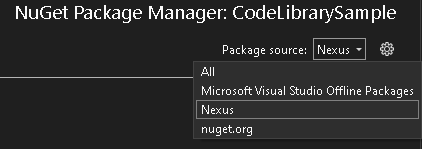
Then, in the upper right corner is a settings button to select where to search for sources, which is where you can select the Nexus repository we added:
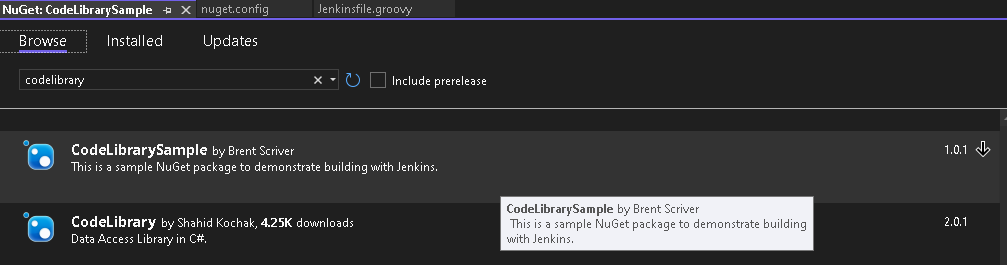
Now you can select any packages that are pushed to your repository. If you have already published, you can confirm your package has been published as well:
There is one final configuration requirement, but it is in projects that will require these NuGet packages.
After configuring a project to use your Nexus NuGet repository, you may encounter errors installing NuGet packages because the Nexus server isn’t using https (which generates a warning in the NuGet restore command). To address this, you can add NU1803 to the list of warnings to suppress for the project:

GitHub Configuration & New Development Processes
Instead of working in the ‘main’ or ‘master’ branch of GitHub, it is recommended to create GitHub branches for development and then merge them into ‘main’ or ‘master’ when complete.
By developing in branches, NuGet packages won’t be superfluously pushed to the NuGet repository. Still, it will test to make sure that when you merge a pull request back to mainline that the NuGet package can be published (as it will test that the version has been updated and report errors if there is a version collision).
To enforce this process, you can modify the settings for your GitHub project:

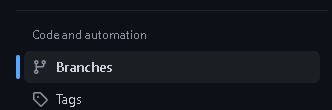
Then select ‘Branches’ under ‘Code and Automation’:
Then we can add a Branch Protection Rule for ‘main’ (in our case):
- Enable ‘Require a pull request before merging’
- If there is only you, disable ‘Require approvals’
- Enable ‘Require status checks to pass before merging’ as we set up automated Jenkins validation of the project.
- Enable ‘Require branches to be up to date before merging’
- Enable ‘Require conversation resolution before merging’
- Enable ‘Do not allow bypassing the above settings’
Now your ‘main’ branch is protected, and changes need to be validated before merging into ‘main’.
Looks cool!
Pingback: CI/CD Revisions! | Brent Scriver
Pingback: CI/CD Revisions! | Brent Scriver