The Unreal Engine has some rather nifty functionality for dealing with localization. We have also made numerous modifications to facilitate our workflow, but I’ll stick to what is in vanilla Unreal (this is based on 4.25).
There are three different string types to use within Unreal:
FString: These are traditional strings most people are used to. When creating a new string it will allocate memory to store the data. Equality comparisons need to check the actual string data.
FName: When you create a name, it is stored in a table in memory permanently (there is no clean up of unused names). Two FNames with the same value point to the same index, which makes equality comparisons very fast: they just compare indices. But the memory usage can grow without bound.
FText: These are localized strings that go through a process of being gathered, translated, and having their values stored in a separate file called a locres file. When evaluating an FText, there is a lookup for the actual value to use.
Epic provides a tokenization system using curly braces, { and }, where you can provide parameters (either positional or named) for an FText format string.
However, we added another one using square brackets, [ & ], where we would take the token within and look up the value as an FName in various tables that were provided to look up information.
A commandlet in Unreal is a mini-program that can be run from the commandline typically for automation.
A couple of significant examples are:
Resave Packages: resaves packages, typically used to resave older packages to bring them up to date.
Fixup Redirects: when assets are moved, they leave redirectors behind so that assets that reference them can be updated. Fixup Redirects updates those assets referencing the redirectors, then removes the redirectors that are no longer used.
Cooking: convert content into a format more optimized for target platforms.
Localization Pipeline: processes text in the game for translation and retrieves translations to include into the game.
How to Create A Commandlet
All commandlets inherit from UCommandlet which provides the basic infrastructure for running a commandlet. As a UObject it automatically gets registered so that it can be found at startup to run.
Typically a commandlet ends in “Commandlet” for discoverability.
Generally commandlets are editor-only and should go into an editor only project.
A commandlet has a Main method that receives commandline parameters and returns an integer exit code that you override. A non-zero exit code is an error and will appear at runtime (particularly relevant in build processes to know something went wrong).
Example:
#pragma once

#include "Commandlets/Commandlet.h"
#include "CommandletSample.generated.h"

UCLASS()
class UCommandletSampleCommandlet : public UCommandlet
{
    GENERATED_BODY()

    virtual int32 Main(const FString& Params) override;
};
The body of a commandlet is like a main function for a standard of C++.
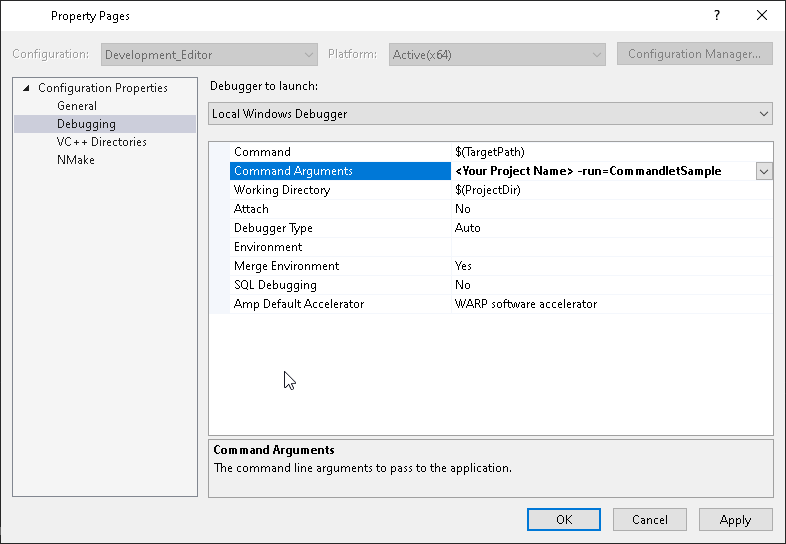
You can run a commandlet from Visual Studio by modifying the properties of the project under Debugging→Command Arguments and add a -run= option for your commandlet.
Example:
From Commandline
To run the commandlet from the commandline (such as for Jenkins) you can run:
Commandlets are primarily about automating operations done over some or all assets.
The Asset Registry is the means by which one gets access to the list and operations available for assets in uasset and umap files.
NOTE: A significant limitation of the asset registry is it is limited in accessing assets that are sub-objects in other objects. For example a map can contain actors and those actors may not be returned when querying the asset registry. Instead it may be required to consider assets that can contain your desired asset.
Once you have your list of assets, you can retrieve them:
for (const FAssetData& Asset : Assets)
{
    <Native Class>* Instance = Cast<Native Class>(Asset.GetAsset());

    // DO STUFF HERE
}
Source Control
You can add, edit, and delete files from source control from commandlets as well.
Source control is available if it has been configured for the user in the project settings or via commandline settings. An example for Perforce is provided:
-SCCProvider=Perforce -P4Port=<your perforce server name and port> -P4User=<p4user> -P4Client=<p4client>
It is recommended to force update otherwise cached information may be used that can give erroneous results. There is a version of this method for getting the state of multiple files at once which is far more efficient than one at a time.
Adding, editing, or deleting consists of actions in the source control provider:
const ECommandResult::Type Result = SourceControlProvider->Execute(ISourceControlOperation::Create<FCheckOut>(), PackageToSave);
Saving Packages
Saving a package after modification does require some care.
There are two ways to save packages whether there is a root object (World in maps) or just the package itself.
We use functions like the following to save the package. NOTE: this is a good place to consolidate functionality across uses:
/**
* Helper function to save a package that may or may not be a map package
*
* @param Package The package to save
* @param Filename The location to save the package to
* @param KeepObjectFlags Objects with any these flags will be kept when saving even if unreferenced.
* @param ErrorDevice the output device to use for warning and error messages
* @param LinkerToConformAgainst
* @param optional linker to use as a base when saving Package; if specified, all common names, imports and exports
* in Package will be sorted in the same order as the corresponding entries in the LinkerToConformAgainst

* @return true if successful
*/
bool UGatherDialogCommandlet::SavePackageHelper(UPackage* Package, FString Filename)
{
    Package->FullyLoad();
    EObjectFlags KeepObjectFlags = RF_Standalone;
    FOutputDevice* ErrorDevice = GWarn;
    FLinkerNull* LinkerToConformAgainst = nullptr;
    ESaveFlags SaveFlags = SAVE_None;

    // look for a world object in the package (if there is one, there's a map)
    UWorld* World = UWorld::FindWorldInPackage(Package);
    bool bSavedCorrectly;

    if (World)
    {
      bSavedCorrectly = GEditor->SavePackage(Package, World, RF_NoFlags, *Filename, ErrorDevice, LinkerToConformAgainst, false, true, SaveFlags);
    }
    else
    {
      bSavedCorrectly = GEditor->SavePackage(Package, NULL, KeepObjectFlags, *Filename, ErrorDevice, LinkerToConformAgainst, false, true, SaveFlags);
    }

    // return success
    return bSavedCorrectly;
}
I was looking for information on signing Unreal’s Pak files and couldn’t find a concise description of the steps required and information needed. Now that I have it solved, I’m making it available here.
For reference we are on version 4.17 of Unreal.
Background
Epic uses 128 bit RSA keys for signing their Pak files and 128 bit AES for encryption. The keys are added to the *Encryption.ini files for your project (like DefaultEncryption.ini) found in your <project>/Config directory.